- "I don't know about this prophecy. I don't think any of us, even Charnel, would be dim enough to start something like that.
But I do know there's a dragon what's been a thorn in my side lately. Now there's a problem a body could fix." – James, The Prophecy (Intermission)
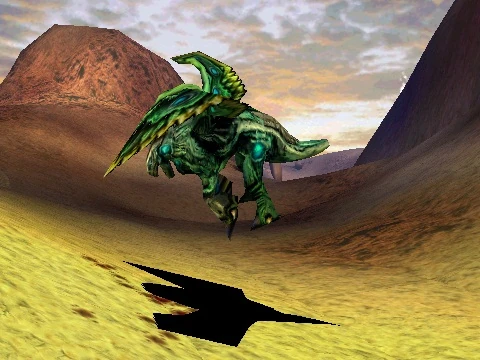
Sirocco, mother of all dragons
- Mission Giver: James
- Location: Solis
- Map Creator: David Merrick
- New Spell: Skin of Stone
- New Creature: Basilisk
- Boon:
- Maximum Mana Level +10%
- Regeneration Rate +10%
- Karma:
| ||||||||||||||||
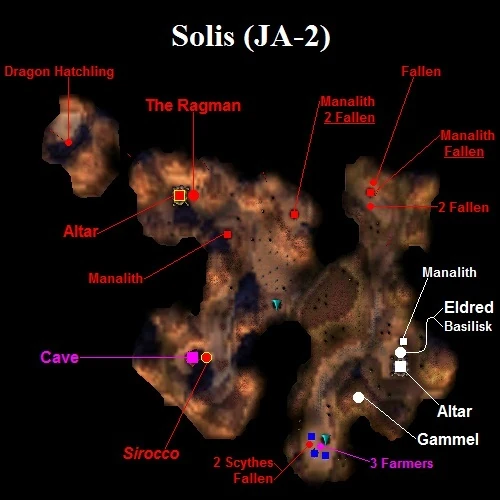
Map of Solis (full image)
Starting Setup[]
Objectives[]
"Subdue" is simply a euphemism for killing.
You will receive only one of these two objectives depending on whether you passed Charnel's first mission (objective 2) or not (objective 1), a mission that also took place in Solis.
Walkthrough[]
- ELDRED: In my own world, dragons were long since extinct, hunted for tooth and scale and heart. As the boneyards drew near, some part of me thought ahead with sorrow to the prospect of slaying so magnificent a creature.
- ZYZYX: Oh, but imp slavery, he's fine with that!
Solis[]
James sends you to Solis to stop Sirocco's madness. If your previous mission was for Charnel, Eldred will explain the source of Sirocco's madness. Before you leave, there are two places on your peninsula that you can visit (if you think that you require some additional souls). To the south of your altar there is a village in which you'll find a couple of Scythes, a Fallen and three dead Farmers. Zyzyx will warn you that there is a necromancer about. To the north of your altar is a Charnel manalith with four Fallen, one of them guardianed to it. Same signs. After leaving your peninsula, you'll get to a valley, the Dragon burial grounds, and soon engage in combat with the Ragman, one of Charnel's necromancers. There are three mana founts around it, two of them already taken by Ragman (one of manaliths has two Fallen guardianed to it). From there you have two options. You can go north to the Ragman's altar or you can go west to Sirocco's lair.
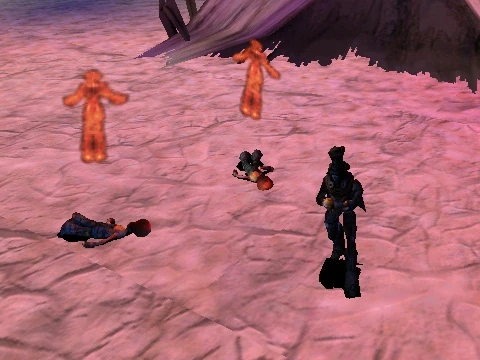
Ragman, the Lord of Terror
Sirocco[]
With enough units you should be able to kill Sirocco. She's tougher than a regular Dragon so use plenty of level 1 ranged creatures and possibly Basilisks to perma-stun her (even though that might just take longer, since it would also make her more resilient to the attacks of your creatures). She mostly goes after you, so you could use that to your advantage. Also don't try to lure her to Ragman, it won't work as they are set to be allies, possibly to prevent them from destroying one another.
Ragman[]
Ragman almost exclusively uses Locusts, so a splash spell combined with several level 1 ranged creatures should take care of both him and his army. Since Solis isn't very big, he doesn't have a place to hide and regroup, so banishing him should be quite easy.
Boon[]
The boon benefactor for this mission is Persephone. She gives you the boon if you've banished Ragman instead of killing Sirocco. She is very pleased that you have released Sirocco from the torment Ragman was putting her through, without killing her, and thus ending her madness.
The karma boost for this boon is as follows:
| ||||||||||||||||
Notes[]
- There is a Dragon Hatchling on an unaccessible neighboring island. Its supposed purpose is unknown.
- You can also control Sirocco as one of your creatures if you complete the mission by banishing Ragman instead of killing her; but only as long as you have enough Karma with Persephone.
| Previous Mission: | Mission Category: | Next Mission: |
| James's Missions | IM-03 |
| Missions in Sacrifice | |||||||||
| Missions | 1 | 2 | 3 | 4 | 5 | 6 | 7 | 8 | 9 |
| Persephone | PE-1 | PE-2 | PE-3 | PE-4 | PE-5 | PE-6 | PE-7 | PE-8 | PE-9 |
| James | JA-1 | JA-2 | JA-3 | JA-4 | JA-5 | JA-6 | JA-7 | JA-8 | JA-9 |
| Stratos | ST-1 | ST-2 | ST-3 | ST-4 | ST-5 | ST-6 | ST-7 | ST-8 | ST-9 |
| Pyro | PY-1 | PY-2 | PY-3 | PY-4 | PY-5 | PY-6 | PY-7 | PY-8 | PY-9 |
| Charnel | CH-1 | CH-2 | CH-3 | CH-4 | CH-5 | CH-6 | CH-7 | CH-8 | CH-9 |
| Intermissions | IM-1 | IM-2 | IM-3 | IM-4 | IM-5 | IM-6 | IM-7 | IM-8 | IM-9 |
| Others | Prologue | The Wanderer's Tale | Respite | The Crucible | ||||||||