- "Whatever Jadugarr is up to, the best way to combat heretics is a right proper godly display. I have been too passive; that don't quite inspire folks. It's time to take back what's mine." – James, Shadow of the Past (Intermission)

The fortress of Karn
- Mission Giver: James
- Location: Karn
- Map Creator: David Msika
- New Spell: Erupt
- New Creature: Flummox
- Boon:
- Maximum Health Level +15%
- Magical Damage Resistance +10
- Karma:
| ||||||||||||||||
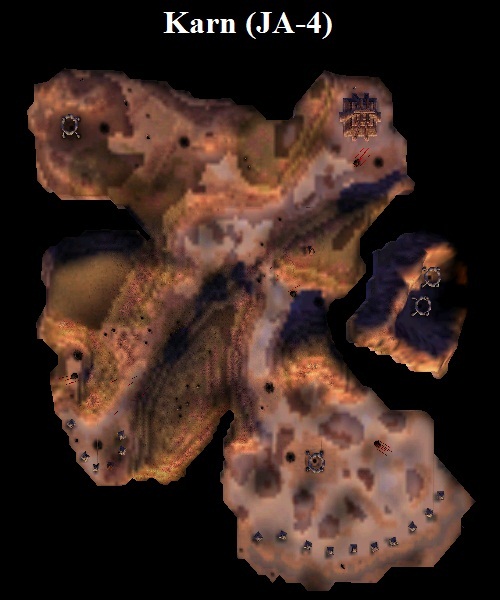
Map of Karn (full image)
Starting Setup[]
Objectives[]
- Defeat the Ragman
- (Optional) Destroy the Plague Worts
- Banish Sorcha
Ragman only needs to be killed once. After that he will remain dead, as will all of his creatures.
Sorcha on the other hand, to be defeated, will have to have her altar desecrated.
Walkthrough[]
- After being subjugated by the forces of Pyroborea, the border stronghold of Karn was being passed into the hands of the hated Ragman. I was sent to drive him out. – Eldred
Karn[]
Pyro tried to offer alliance to James, but unfortunately it failed, and the place of negotiations, the border fortress of Karn, was seized by the forces of Pyroborea. At the same time Charnel offered alliance to Pyro and succeeded. As the part of that alliance Karn was given to Ragman, Charnel's newly reacquired necromancer, so James is sending you to Karn "to drive him out". At the very start of this mission James will explain to you that Ragman, like you, has just now arrived to Karn (he doesn't have any manaliths or even an altar) and because he lacks a link to his god (his previously mentioned lack of an altar) if he is killed, he will remain dead for good.
Ahead of your altar, you'll find two manaliths and a small rescuable army composed of three Earthflings and Gammel. He will inform you of their poor progress and unites you together with the rest of them. For a while, you can take your time, build your army slowly and such, because the AI is still turned off. Upon venturing further, you will have your encounter with Ashur. After that, the AI is on, so stay on guard from then on. If you don't try to find Ragman, he will find you.
Ragman and Sorcha[]
Even though you can deal with them in any order, it is recommended that you defeat Ragman first, since he is weaker and more easily defeatable. From the point of the encounter, Ragman will come from the west, carrying with him a couple of Deadeyes, a Necryl, some Scythes and other Minions he might have built. One creature in particular that will be following him is a Pyrodactyl (letting you know that Pyro's forces and their leader have not left the area). Anything that you kill or any free soul that he has, he will immediately turn into Locusts. Also, when you venture towards a building called Plague Wort (you should see it from your altar) you see you'll be ambushed by half a dozen Fallen. Since Ragman has no altar or a shrine (nor will he build one) he can't convert souls. Your main course of action should be to focus all the damage on Ragman himself. Even though he doesn't have a manalith, he does receive mana income from Sorcha's manaliths, so expect him to heal both himself and his creatures. After he is dead, all of his creatures will keel over and die as well, and their souls will be yours for the taking.
After you've defeated Ragman you might want to explore the map for extra manaliths and souls. You'll find most of the farmers on the map dead, except the ones behind Sorcha's altar. To get to Sorcha's altar simply follow the trail of manaliths she most likely created. Along this trail, which consists of three manaliths (one behind the first plague wort and two on route to Sorcha's altar), Sorcha will leave about three Spitfires to guard each manalith and sometimes she might cast the Guardian spell on them. This is a great way to thin out her forces, because if a spitfire is killed, another will be sent to replace him (so instead of destroying her manaliths right away, try to use this technique to drain her of her souls a bit). When deprived of her souls and the manaliths near her altar, her desecration should be easy, if not, be on the defensive to try to win over some souls.

One of the four Plague Worts
Plague Worts[]
When exploring and fighting along the map you'll notice some strange mushroom-shaped buildings. If you approach the one you see first (the one visible from the site where you encounter Marduk), Zyzyx will explain to you that they are means for Charnel to change landscape (James calls it "terror-forming"). Unlike manaliths they don't heal over time, so any damage done to them is permanent. If approached by ground or melee creature (yourself included) the area around the plague worts will start to be diseased and the creatures will take damage. Since level 1 flying creatures don't do much damage against them, send Gammel to destroy them. There are total of four plague worts on the map and they are mostly found near settlements and farmers:
- The first one has been mentioned before on several occasions. It is visible from the site where you encounter Marduk and there are two farmers nearby.
- The second one is located to the south. It is near a village with five houses, three dead farmers and three living ones, in a U-shaped valley, behind the second manalith.
- The third one is behind Sorcha's altar, in the desert a bit away from the series of houses, also present there. It should be visible when you find Sorcha's altar.
- The forth one is near a ziggurat, with five dead farmers and a manalith. The ziggurat is hard to miss, since it's pretty large, but it is found on the northern part of the island.
To get the boon, all plague worts must be cleared from the map before you defeat both wizards.
Boon[]
The boon benefactor for this mission is James. He gives you the boon if you've completed the optional objective for this mission. He doesn't reveal much more information about the reason why.
There is no karma boost for this boon.
Bugs[]
- This mission is susceptible to a cutscene bug which can render the mission unwinnable. You can attempt to press ESC a few times, or save the game before desecrating the enemy's altar. [1]
| Previous Mission: | Mission Category: | Next Mission: |
| James's Missions | Interlude |
| Missions in Sacrifice | |||||||||
| Missions | 1 | 2 | 3 | 4 | 5 | 6 | 7 | 8 | 9 |
| Persephone | PE-1 | PE-2 | PE-3 | PE-4 | PE-5 | PE-6 | PE-7 | PE-8 | PE-9 |
| James | JA-1 | JA-2 | JA-3 | JA-4 | JA-5 | JA-6 | JA-7 | JA-8 | JA-9 |
| Stratos | ST-1 | ST-2 | ST-3 | ST-4 | ST-5 | ST-6 | ST-7 | ST-8 | ST-9 |
| Pyro | PY-1 | PY-2 | PY-3 | PY-4 | PY-5 | PY-6 | PY-7 | PY-8 | PY-9 |
| Charnel | CH-1 | CH-2 | CH-3 | CH-4 | CH-5 | CH-6 | CH-7 | CH-8 | CH-9 |
| Intermissions | IM-1 | IM-2 | IM-3 | IM-4 | IM-5 | IM-6 | IM-7 | IM-8 | IM-9 |
| Others | Prologue | The Wanderer's Tale | Respite | The Crucible | ||||||||