Upload the image here and immediately change the image description parameter. |
- "The failed attack on Cindercrag has overextended James' forces. With an appropriate feint to the south by Buta, you should be able to reach Agothera unmolested. That will teach the worm!" – Pyro, Desperate Measures (Intermission)
- Mission Giver: Pyro
- Location: Agothera
- Map Creator: Scott Holty
- New Spell: Firewall
- New Creature: Bombard
- Boon:
- Maximum Health Level +15%
- Physical Damage Resistance +10

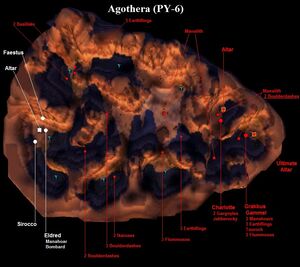
Map of Agothera (full image)
Starting Setup[]
Objectives[]
Walkthrough[]
- ELDRED: With Pyro's overwhelming victory at Cindercrag, the path to James' home of Agothera was laid bare.
- ZYZYX: But once we got to Agothera, there'd be no help from Pyro. In one god's home the others can't interfere.
Attacking Agothera[]
Tired of James' meddling, Pyro orders you to stage an attack on Agothera. With Buta attacking the south of the Glebe and James' failure to attack Cindercrag, the island is left exposed to a direct assault. He hopes to get rid of James for good. Agothera is massive; it is possibly the biggest landmass from all the playable maps during the campaign. It also has no holes or abysses in which creatures could fall in. Charlotte and Grakkus, the two geomancers defending James' altars (including the ultimate altar) defend the island, and defend it well. The starting soul supply is limited; 5 souls plus the Bombard. Therefore, the first priority is to look for more souls.
Hunt for souls (and manaliths)[]
There are two ways one could go. To the left, there is only one easily accessible mana fount, hidden behind a small hill. As you approach, you will be ambushed by three Earthflings, and four Basilisks will be summoned near you as well. This 11-soul army is easily disposed of with a few creatures, and will greatly boost your soul arsenal.
One could also go forward. To the right, there is a canyon with a mana fount - build a manalith there. After that, go back and enter the narrow canyon right ahead; two Boulderdashes will appear. They are worth 8 souls, but might be somewhat dangerous. Sped-up brawlers can kill them easily if they can get close. Now cross the mountain to your right and go forward; you will descend into yet another canyon, where two Ikaruses will attack you. These are worth 6 souls. There is also a nearby mana fount. If you go forward to exit the canyon, you will be ambushed by some Flummoxes, which will contribute once again to your army.
The Geomancers[]
Sooner or later, you'll bump into either Charlotte or Grakkus (hopefully not both at once). Charlotte has the smaller army, but controls a Jabberrocky. Grakkus is level 7, one higher than you, and has a bigger army. He also commands Gammel (if alive), who is as tough as always and he might give you trouble; very often Grakkus doesn't use him against you in a battle, but sends him flying around to destroy your manaliths, messing with your mana income. If you spot Gammel attacking a manalith of yours, or flying towards one, try to kill him, but you may not always succeed. Creatures with Burning Attack and Viscous Oil from a Pyrodactyl (should you have them) will work together well - if he doesn't fly too high. Hit him every chance you get, though, and he will fall eventually. Do not convert him unless you are sure the enemy wizards won't intercept the sac doctor, otherwise he may be freed and then the whole ordeal starts again. It might be best for you to actually allow the ever soul-hungry AI to collect Gammel's souls, thus destroying him for good.
As always, the advantage of fighting against James' wizards is that they often leave their slower creatures behind. If you can kill the wizards with your powerful Pyromaniacs (if you have them) and Bombards, using Pyrodactyl oil as always, you can then hurry to pick off the slower units which will try to retreat and usually won't fight back. This will enable you to cripple Charlotte and Grakkus in short order.
The Final Assault[]
Make your way to the two small canyons which house the two enemy altars, replacing enemy manaliths with yours along the way. Both altars are guarded by Boulderdashes guardianed to manaliths; these are tough and might do great damage to your army if you do not take on them sufficiently prepared. As always, bombers attacking the manalith will kill them quick if they just stay alive. Desecrate both altars, one after the other, and the mission will be complete as Pyro revels in his triumph.
Boon[]
The boon benefactor for this mission is Pyro. He gives you the boon if you win the mission as per usual.
The karma boost for this boon is as follows:
| ||||||||||||||||
| Previous Mission: | Mission Category: | Next Mission: |
| Pyro's Missions | IM-07 |
| Missions in Sacrifice | |||||||||
| Missions | 1 | 2 | 3 | 4 | 5 | 6 | 7 | 8 | 9 |
| Persephone | PE-1 | PE-2 | PE-3 | PE-4 | PE-5 | PE-6 | PE-7 | PE-8 | PE-9 |
| James | JA-1 | JA-2 | JA-3 | JA-4 | JA-5 | JA-6 | JA-7 | JA-8 | JA-9 |
| Stratos | ST-1 | ST-2 | ST-3 | ST-4 | ST-5 | ST-6 | ST-7 | ST-8 | ST-9 |
| Pyro | PY-1 | PY-2 | PY-3 | PY-4 | PY-5 | PY-6 | PY-7 | PY-8 | PY-9 |
| Charnel | CH-1 | CH-2 | CH-3 | CH-4 | CH-5 | CH-6 | CH-7 | CH-8 | CH-9 |
| Intermissions | IM-1 | IM-2 | IM-3 | IM-4 | IM-5 | IM-6 | IM-7 | IM-8 | IM-9 |
| Others | Prologue | The Wanderer's Tale | Respite | The Crucible | ||||||||