Upload the image here and immediately change the image description parameter. |
- "We must still direct the main of Our strength against those who seek to destroy Us. Yet We would know more of this Ashur. Seek out Jadugarr and discover what you can." – Persephone, Shadow of the Past (Intermission)
- Mission Giver: Persephone
- Location: Urghaz
- Map Creator: David Msika
- New Spell: Rainbow
- New Creature: Gnome
- Boon:
- Maximum Mana Level +10%
- Regeneration Rate +10%
- Karma:
| ||||||||||||||||

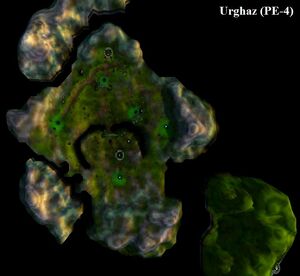
Map of Urghaz (full image)
Starting Setup[]
Objectives[]
- Find and confront Jadugarr
- Defeat Jadugarr
Finding Jadugarr will be easy since his altar is not far from yours.
Attacking anything that belongs to him also does the trick. No matter what you do, you will have to fight him.
Walkthrough[]
- Rangers were sent forth to scry for the hiding place of the cult leader Jadugarr. Eluding a trap laid for him in Telluria, he made his way to Urghaz, the once proud home of the trolls. – Eldred
The Cult[]
During the last intermission James mentioned that a cult was forming around someone named Ashur lead by Jadugarr. After he avoided the trap in Telluria he escaped to Urghaz where the Goddess wants you to confront him. When you take a few steps to the nearest mana fount you will have your own encounter with Ashur. You will easily see Jadugarr and just approaching him will be enough. However, before you fight him, you could seize all non-taken mana founts. One to the south-east from your altar has nothing special about it, but it could serve a purpose later. At the one to the south-west, past a village (don't kill the Peasants), four Storm Giants will appear. Killing them will not start your fight with Jadugarr, so it's basically eight free souls for you (doing this later will only make it harder for you).
Mutants[]
After doing all that you can, before the fight, you can either attack something that belongs to Jadugarr (with this you could get a tactical advantage, e.g. destroying one of his manaliths) or approach him at his base (if you don't do it the right way you might miss on a bit of story) to make him become your enemy. Venturing further to one of his more distant manaliths will also do the trick. As soon as he becomes your enemy three Mutants will appear at that mana fount south-east of your altar and start attacking your manalith if you've built it. If you have simply teleport to it and approach the mutants (you could kill them, but that's a much less profitable way). They will join you along with some friends of theirs:
- 1 Mutant at Jadugarr's manalith not far from the first three
- 2 Mutants between the village and the aforementioned manalith to the south-west
- 2 Mutants a little farther from the same manalith
They are a bit scattered, but even four of them should make a fine artillery for your army.
Jadugarr[]
After a moment to regroup, Jadugarr will attack you. You should just ignore his manaliths, since they are too far to be of any use to him, and go straight for his altar.
Boon[]
The boon benefactor for this mission is Persephone. She gives you the boon if you spare the Mutants that start attacking you. She then pities them and asks them to join you, to which they confusedly oblige.
There is no karma boost for this boon.
| Previous Mission: | Mission Category: | Next Mission: |
| Persephone's Missions | Interlude |
| Missions in Sacrifice | |||||||||
| Missions | 1 | 2 | 3 | 4 | 5 | 6 | 7 | 8 | 9 |
| Persephone | PE-1 | PE-2 | PE-3 | PE-4 | PE-5 | PE-6 | PE-7 | PE-8 | PE-9 |
| James | JA-1 | JA-2 | JA-3 | JA-4 | JA-5 | JA-6 | JA-7 | JA-8 | JA-9 |
| Stratos | ST-1 | ST-2 | ST-3 | ST-4 | ST-5 | ST-6 | ST-7 | ST-8 | ST-9 |
| Pyro | PY-1 | PY-2 | PY-3 | PY-4 | PY-5 | PY-6 | PY-7 | PY-8 | PY-9 |
| Charnel | CH-1 | CH-2 | CH-3 | CH-4 | CH-5 | CH-6 | CH-7 | CH-8 | CH-9 |
| Intermissions | IM-1 | IM-2 | IM-3 | IM-4 | IM-5 | IM-6 | IM-7 | IM-8 | IM-9 |
| Others | Prologue | The Wanderer's Tale | Respite | The Crucible | ||||||||