Upload the image here and immediately change the image description parameter. |
- "We must press our advantage. Foolish James will be destroyed, much as he deserves, and finally his people will be free from his unworthy leadership. Consider this a mercy killing." – Stratos, No Mercy (Intermission)
- Mission Giver: Stratos
- Location: Agothera
- Map Creator: David Msika
- New Spells: Cloudkill, Tornado
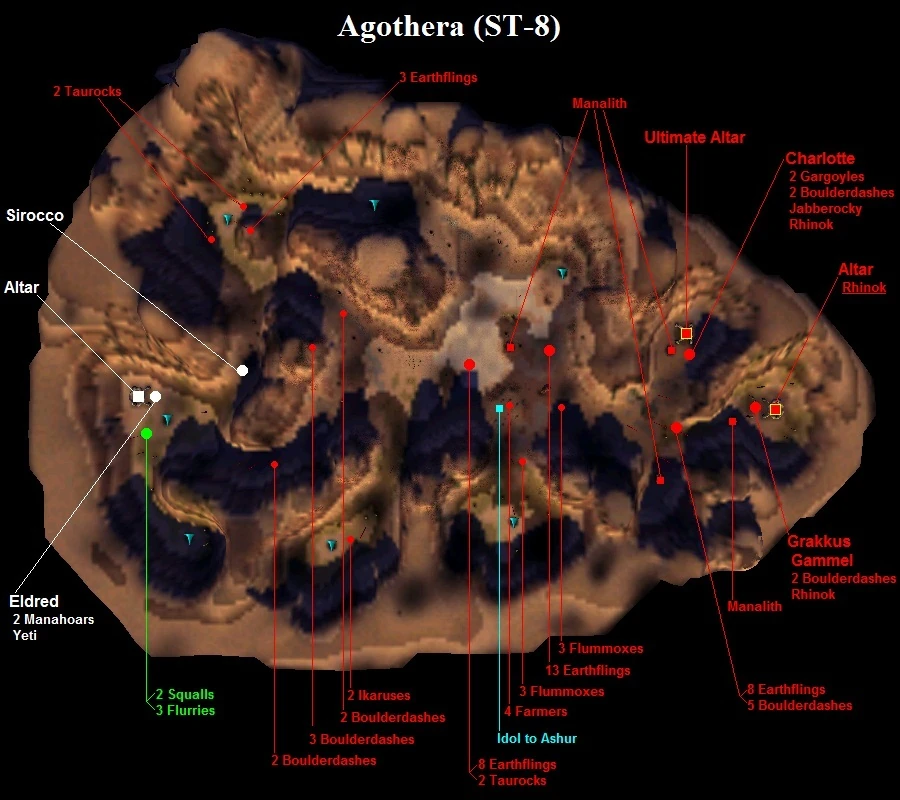
Map of Agothera (full image)
Starting Setup
Objectives
Walkthrough
- "Stratos was right. Having ceded so many key territories into the care of the Lord of the Heavens, there was little James could do to prevent an attack on his home." – Eldred
Attacking Agothera
You arrive at Agothera with an impressive force of 3 Flurries and 2 Squalls not far away from you, as well as a Yeti and a couple of Manahoars right next to you. Unfortunately, a cinematic that triggers straight away will cast a Bore spell, dropping down the Flurries and Squalls into the abyss. This sets the scene for the battle of Agothera: lots and lots of traps and ambushes.
However there is a little trick to save some Flurries and Squals: bind your new Tornado spell to any key, mark "Show start up tips" in option menu and restart level. When level reload, game will be paused due to tip panel. After you close it, you will have about 1 second to cast Tornado exactly on your creatures, so they will be in the air long enough so land restored.
The Scramble for Souls
Your initial army is now quite inadequate, so you'll need to harvest quite a few souls before Charlotte comes knocking.
There are two ways one could go. To the north, there is only one easily accessible mana fount, hidden behind a small hill. As you approach, you will be ambushed by three Earthflings, and four Taurocks will be summoned near you as well. A Yeti or two should slice them all up.
To the south, there is a canyon with a mana fount - build a manalith there. After that, go back to your altar and go east; entering a narrow canyon right ahead, two Boulderdashes will appear. They are worth 8 souls, but might be somewhat dangerous - though no match for a Yeti if it can just get close. Now cross the mountain to the south and go forward (it will be explained later on why you shouldn't enter it from the front); you will descend into yet another canyon, where two Ikaruses will attack you. These are worth 6 souls. There is also a nearby mana fount. Watch out: if you go forward to exit the canyon, a Bore spell will be cast at you. If you haven't yet converted the Ikaruses, the corpses may fall down the abyss if they died approximately where they were at the start. This can be good if you have Soul Wind: the two times three souls the Ikaruses yield will become blue as they float down, which you can then gather. If you don't have Soul Wind (or Soul Mole, even) however, you'll lose the souls.
If you go forward to exit the canyon, you'll be ambushed by three Flummoxes, which can be killed for another 9 souls.
It is best to go to the north first, as Charlotte will usually attack from this direction, and you don't want to be disturbed while you are dealing with the ambushing Earthflings and Taurocks.
The Geomancers
Charlotte and Grakkus will both mobilise straight away, although Charlotte is much more aggressive; in fact, Grakkus may not even come personally to attack you for a while, although he will often send Gammel and some Rhinoks to harass your manaliths. If you spot Gammel attacking a manalith of yours, or flying towards one, try to kill him, throwing all flying and missile units you have at him. With the help of your spells (a Freeze spell is useful for dropping him to the ground so that he isn't out of reach of your ranged ground units) he should fall, although he might also flee before you can kill him (that's what he always tries to do). Once you kill him, do not convert him unless you are sure the enemy wizards won't intercept the sac doctor, otherwise he may be freed and then the whole ordeal starts again. It might be best for you to actually allow the ever soul-hungry AI to collect Gammel's souls, thus destroying the troublesome hero for good.
If Gammel and a Rhinok start attacking your manalith together, you may have a more difficult time as the Rhinok can kill low-flying fliers as well as ground units with ease. Attack him from far above with massed bombers or low-level fliers to bring him down, or use several Yetis. Concentrate on Gammel first, though, as the Rhinok is actually almost harmless to a manalith.
James' wizards have huge armies, and the Rhinok support they have this time around can really do a number on your ground units. Therefore, don't seek to win through brute force; use Tornado and Cloudkill together to throw the enemy army into disarray, starting with the wizard, and use a few sped-up Yetis to take out Boulderdashes. Your goal is to kill an enemy wizard and pick off the slower support creatures while the geomancer tries to recover. If the enemy is unshielded, your Yetis will slash them apart, but if they have Stone Skin on, killing them becomes very hard. In this case, if you have Flurries, use them to slow down the wizard's retreat while sending your Yetis after them to wear them down. Disruptive creatures such as Brainiacs and Shrikes are also a great help.
Agothera is enormous in size, and every time an enemy geomancer dies, you have a lot of time until he or she recovers. While the enemies greatly outnumber you, if you can kill the enemy wizard it is not uncommon to be able to convert every single creature he or she has left behind, even if it's more than half of the army.
More Traps
Once you win a few battles and convert some souls, it's time to move out. Guardian a creature or two to your final manalith to slow down anyone who still tries to invade while you're away, then start marching towards the middle of the map. Here are the ambushes you may meet at this stage:
- If you go north from the "earthfling-taurock ambush" manalith, three Boulderdashes will appear on a hillside and start shooting at you.
- If you advance from the south, however, you are more likely to be attacked by 8 Earthflings and 2 Taurocks as you approach the James manalith in the middle.
- Once you are next to that manalith, more Earthflings (a lot of them, more than 10) will surround you and start to attack you.
In general, these ambushes are only harmful if you're also surprised by an enemy wizard while ambushed - and as the enemies tend to wander around a lot, this will not always happen. You can convert the souls of all these Earthflings, as well as the heretics surrounding the nearby idol to Ashur, but unless you feel your army is way too little, don't bother - if you've gotten this far, chances are your army is big enough to deal with anything near the enemies' altars.
If, at any point, the enemies start attacking your manalith near your altar, teleport back to deal with them, but feel free to ignore any other manaliths being attacked in your backyard, as they will not help your mana income while you're on the other side of the map. Capture the ones in the middle instead. Charlotte or Grakkus holding manaliths far away from their altars might even help during the desecration process later on.
The Final Showdown
If you just go further eastward, entering the intersection from where the two paths go to the two altars, you may be ambushed once more, if you go too close to the two eggtrees. (The trigger area for this ambush is quite small, though.) James will throw everything he has at you, with 4 Boulderdashes and 8 Earthflings surrounding and attacking you. With your close proximity to the enemy altars, this is unquestionably the most dangerous ambush yet, though manageable if you're not disturbed. Still, you can avoid this battle altogether by simply crossing the hill instead, approaching Charlotte's ultimate altar from above. The final manalith will be undefended, and so will the altar, so desecrating Charlotte's altar is a matter of killing the spider lady. If the geomancers have even one manalith far away from their altars, they will likely be camped out there; depending on the creature used for the desecration, Charlotte may perish while hurrying back to her altar without you having to intervene. (As always, she will not teleport back.) Same for Grakkus, although his final manalith is guarded by a Boulderdash. This should not give you trouble at the point.
Finish off Charlotte and Grakkus, and with them, James as well for the victory.
Trivia
- Unlike how in Pyro's sixth mission or James's ninth mission the ultimate altar was the one most eastward, this time around Charlotte's altar (the closer one) is the ultimate altar. As the plot suggests that Grakkus is James' champion, and Charlotte's altar is more susceptible to an attack anyways, this may be an accidental mixup.
- Charlotte's final manalith should be defended by a Rhinok, but the map creator accidentally Guardianed the wrong Rhinok to the manalith. The Rhinok in question belongs to Grakkus, which means that the creature stays unguardianed.
| Previous Mission: | Mission Category: | Next Mission: |
| Stratos' Missions | IM-09 |
| Missions in Sacrifice | |||||||||
| Missions | 1 | 2 | 3 | 4 | 5 | 6 | 7 | 8 | 9 |
| Persephone | PE-1 | PE-2 | PE-3 | PE-4 | PE-5 | PE-6 | PE-7 | PE-8 | PE-9 |
| James | JA-1 | JA-2 | JA-3 | JA-4 | JA-5 | JA-6 | JA-7 | JA-8 | JA-9 |
| Stratos | ST-1 | ST-2 | ST-3 | ST-4 | ST-5 | ST-6 | ST-7 | ST-8 | ST-9 |
| Pyro | PY-1 | PY-2 | PY-3 | PY-4 | PY-5 | PY-6 | PY-7 | PY-8 | PY-9 |
| Charnel | CH-1 | CH-2 | CH-3 | CH-4 | CH-5 | CH-6 | CH-7 | CH-8 | CH-9 |
| Intermissions | IM-1 | IM-2 | IM-3 | IM-4 | IM-5 | IM-6 | IM-7 | IM-8 | IM-9 |
| Others | Prologue | The Wanderer's Tale | Respite | The Crucible | ||||||||